
Craft tutorials, techniques & ideas on art journal, mixed media, jewelry making, decoupage, scrapbooking, reusing & recycling materials.
Showing posts with label DIY. Show all posts
Showing posts with label DIY. Show all posts
Wednesday, 6 February 2013


Sunday, 27 January 2013
Stamp fabric with bleach
A very clever tutorial of http://www.untrendylife.com/ on how to stamp your clothes or any other fabric with bleach! Look at the result....it is great!!!!


Monday, 14 January 2013
How To Make Your Own Patterned Paper
How To Make Your Own Patterned Paper by http://www.peonyandparakeet.com/
Easy techniques and most of all inspiring!!!!


Tuesday, 8 January 2013
Saturday, 22 December 2012
Paper clay bird and its wire cage!
I love this little paper clay bird and its cage. They are very easy to make and the result is impressing.
You can find the paper clay bird tutorial at http://theadventuresofbluegirlxo.blogspot.gr and the wire cage tutorial here. Enjoy!!!!!!!

Monday, 17 December 2012
Christmas tree
I love those white paper christmas trees. I am about to make a couple.
If you like them too, just visit ninuskan.blogspot.gr/ or click and save the template from this page. Enjoy!!!!


Monday, 10 December 2012
Cork Trees
Do you have corks that you don't know what to do with them? Creat a Christmas tree!!!!
Here you can see an interesting idea with colored corks, shared by http://www.stonewallkitchen.com.
You can even cut peaces of scrap paper and glue it on your corks.
In order to glue the corks use your Glue gun.
Enjoy!!!

Friday, 30 November 2012
Christmas tags!
 These beautiful tags can be used as christmas tree ornaments, bookmarks,
tags for gifts and decoration. You can watch the tutorial here or you can visit Penny Black site.
These beautiful tags can be used as christmas tree ornaments, bookmarks,
tags for gifts and decoration. You can watch the tutorial here or you can visit Penny Black site.Enjoy!!!
Christmas tree -Mixed Media
Do you like this christmas tree and you want to see how you can make it?
Please visit Inspired by blog and enjoy the two video-tutorials. They are great!!!

Please visit Inspired by blog and enjoy the two video-tutorials. They are great!!!

Monday, 15 October 2012
Design your own stamps without carving
This is an interesting technique of making stamps with silicone caulking and acrylic plexiglass. You can save money and creat stamps with our own design.
Thanks to http://blog.makezine.com/ for the nice tutorial!
Note: You can cut plexiglass to size by scoring a straight line several times using an X-Acto knife and metal ruler, and then placing the plexiglass on a table with the score line over the edge and snapping it in one quick motion.

Step 1: Sketch your designs on paper. These botanical designs range between 4″-6″ wide. The leaves are 2″-3″. But your designs can be any size you like.

Step 2: Hold the caulk tube vertical and tap it against a flat surface 8-10 times to remove any air bubbles. Cut the tip of the tube with scissors. I usually cut about 1/8″ away. Remember, the size of the hole on the tip of the tube will be the thickness of your lines, so cut cautiously! You can always cut a little more off, but once the tube is cut, you can’t make the opening smaller again.
Place your design under a piece of plexiglass and trace over it with the caulk, making sure you are evenly squeezing the tube and all drawn lines are touching the plexiglass. The harder you squeeze the tube, the thicker your lines will be. In some designs, this might be a desirable effect. You might want to practice on some scrap paper or plexiglass before you start on your stamp.

Step 3: Let the caulking cure for 24 hours, and then your stamp is ready.

Step 4: On a sheet of plexiglass, squeeze a dollop of paint. To create an ombre print, you will need to use two paint colors at the same time. Load the brayer with paint as you roll.

Step 5: Using your brayer, apply the paint on the stamp. You will need to make three to four passes to ensure all lines are covered.

Step 6: Carefully press the stamp on your desired surface.


Step 7: Create a beautiful botanical pattern! Clean your stamps immediately after use by wiping the surface with a dampened paper towel and any small spaces with a dampened cotton swab. Then, wash gently under running water with a little bit of soap.

Thanks to http://blog.makezine.com/ for the nice tutorial!
Materials
1/8″-thick acrylic plexiglass; can be found at hardware stores
X-Acto knife
Metal ruler
Silicone rubber caulking (clear)
; can be found at hardware stores
Water-based paint
Brayer
Note: You can cut plexiglass to size by scoring a straight line several times using an X-Acto knife and metal ruler, and then placing the plexiglass on a table with the score line over the edge and snapping it in one quick motion.
Step 1: Sketch your designs on paper. These botanical designs range between 4″-6″ wide. The leaves are 2″-3″. But your designs can be any size you like.
Step 2: Hold the caulk tube vertical and tap it against a flat surface 8-10 times to remove any air bubbles. Cut the tip of the tube with scissors. I usually cut about 1/8″ away. Remember, the size of the hole on the tip of the tube will be the thickness of your lines, so cut cautiously! You can always cut a little more off, but once the tube is cut, you can’t make the opening smaller again.
Place your design under a piece of plexiglass and trace over it with the caulk, making sure you are evenly squeezing the tube and all drawn lines are touching the plexiglass. The harder you squeeze the tube, the thicker your lines will be. In some designs, this might be a desirable effect. You might want to practice on some scrap paper or plexiglass before you start on your stamp.
Step 3: Let the caulking cure for 24 hours, and then your stamp is ready.
Step 4: On a sheet of plexiglass, squeeze a dollop of paint. To create an ombre print, you will need to use two paint colors at the same time. Load the brayer with paint as you roll.
Step 5: Using your brayer, apply the paint on the stamp. You will need to make three to four passes to ensure all lines are covered.
Step 6: Carefully press the stamp on your desired surface.
Step 7: Create a beautiful botanical pattern! Clean your stamps immediately after use by wiping the surface with a dampened paper towel and any small spaces with a dampened cotton swab. Then, wash gently under running water with a little bit of soap.
Thursday, 4 October 2012
Office organizer from cardboard!
Instead of adding white paper you could paint the boxes white.
Enjoy!

Tuesday, 2 October 2012
Another Mixed Media Art Journal video
She makes it look so simple!
She compines nice techniques with beautiful colors.
Enjoy!
Sunday, 30 September 2012
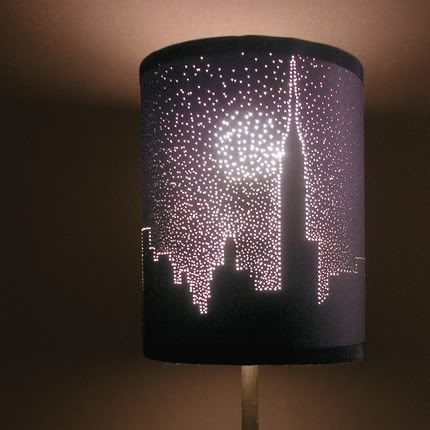
Altered Lampshade
This lovely lampshade is made by poking holes to make the picture. Easy to do, if you have a lampshade that looks simple or boring and you want to change it. Enjoy!

Friday, 21 September 2012

Sunday, 16 September 2012
Fabric covered mat
This tutorial is for creating a 8x10 mat that holds a 5x7 picture. Thanks to Delightful destructions blog .


MATERIALS:


THE PROCESS:
1.With all your supplies laid out and ready to go, spray the back side of the fabric and the front of the mat with a generous coat of spray glue (outside).
2.Lay your glue covered fabric on a table, glue side up. Carefully place your glue covered mat face down onto the fabric. Make sure to center it, leaving equal portions on each side. Press down firmly all over the back side of the mat. Check the front of the fabric to make sure all air bubbles are out.

3.Cut off the corners of the fabric with scissors... careful to leave only a tiny margin by the corner of the mat (see close-up pic)


4.Pulling firmly, starting next to the corner, pull the fabric up over the mat, one side at a time. Press down, smoothing out all air bubbles.

5. With your knife, cut the interior of the fabric diagonally out, starting in each corner -creating an X. Trim edges.


6. Again, pull fabric up over the edge of the mat, starting in the corners. Pull firmly to ensure that the fabric is tight, especially in the corners. Use Mod-podge on your foam brush to help adhere, if fabric doesn't stick. Once all edges are in place, use Mod-podge to go over the edges of the fabric for extra security and to prevent any fraying. Also pay special attention to the outside corners. These will need a dab of Mod-podge, smoothed down with your finger, also (second photo shows how corner should look before smoothing down).


7. Let dry thoroughly and place in frame!!


MATERIALS:
- a rectangular piece of cotton fabric approx. 11x13 in. or a bit bigger (it doesn't have to be cut perfectly)
- a 8x10 mat - you can either purchase a pre-cut mat or cut your own out of mat board
- spray glue -nothing beats 3M Super 77 found at Hobby Lobby or hardware stores
- a scissor - one you don't mind getting glue on
- a sheet rocking knife with a thin blade... an x-acto knife/craft knife will work, too
- Mod-podge
- small foam brush


THE PROCESS:
1.With all your supplies laid out and ready to go, spray the back side of the fabric and the front of the mat with a generous coat of spray glue (outside).
2.Lay your glue covered fabric on a table, glue side up. Carefully place your glue covered mat face down onto the fabric. Make sure to center it, leaving equal portions on each side. Press down firmly all over the back side of the mat. Check the front of the fabric to make sure all air bubbles are out.

3.Cut off the corners of the fabric with scissors... careful to leave only a tiny margin by the corner of the mat (see close-up pic)


4.Pulling firmly, starting next to the corner, pull the fabric up over the mat, one side at a time. Press down, smoothing out all air bubbles.

5. With your knife, cut the interior of the fabric diagonally out, starting in each corner -creating an X. Trim edges.


6. Again, pull fabric up over the edge of the mat, starting in the corners. Pull firmly to ensure that the fabric is tight, especially in the corners. Use Mod-podge on your foam brush to help adhere, if fabric doesn't stick. Once all edges are in place, use Mod-podge to go over the edges of the fabric for extra security and to prevent any fraying. Also pay special attention to the outside corners. These will need a dab of Mod-podge, smoothed down with your finger, also (second photo shows how corner should look before smoothing down).


7. Let dry thoroughly and place in frame!!


Friday, 14 September 2012
Sticky Notes Clipboard from Coasters

Thanks to huckabyshappilyeverafter.blogspot.gr
What you’ll
need:
-Restaurant coasters from places like
On the Border, Chili’s, etc. (just ask for them, they gave me a hand full)
-Scrapbook paper
-Elmers glue or Tacky glue
-Binder clips (these came in different
colors from Staples)
-Ink to do distressed edges (I used Tim
Holtz Distress Ink in Walnut)
-Foam ink applicator
-Ribbons & embellishments
First,
choose your choice of scrapbook paper. I used two coordinating pieces so that I
can do one on each side. You’ll want to then trace the coaster onto the back
side of the scrapbook paper and then cut carefully. I had to cut just inside my
line I drew so that it wouldn’t hang off the edges.

Next you want
to place glue on the coaster evenly. Make sure you get right up to the edges to
prevent lifting. I kind of spiraled around the coaster and used my finger to
spread the glue as you can see in the pictures.


Carefully
place the paper onto the coaster. Make sure you then press out all the bubbles,
I used a credit card. Do this on both
sides of the coaster. Be careful not to
but too much glue because it’ll make the coaster warp a bit. If you notice
this, just place a heavy book on top of it until it dries completely.

Optionally,
you can ink the edges. This paper I picked looks good with inked edges but you
don’t have to. Start with SMALL strokes. It’s easier to add more if you think
you need more later. As you can tell in the picture, I only ink on one side of
the foam applicator. Just dab once or twice lightly.

Then start
off just going side to side on the very edge of the coaster. ALWAYS
start from
the edge, not from the middle of the paper. Once you get a little
comfortable
on the inking, SOFTLY drag the foam applicator starting from the edge
and with
short small strokes. I like my corners dark so I gave it at least 3
passovers
on the corners. Do this to both sides and let dry for about 30 minutes. I
didn't put any Modge Podge but someone recommended so, but this is
optional once it's completely dried.

Next, dress
up you binder clip. You can add ribbons, embellishments, or even glue some of
the scrapbook paper on to the binder clip so it’ll match.
 |
| Here I just tied strips of ribbon in to knots one on top of the other. |
Now all you
need is your post it note. But how about a writing utensil to go with it. If
you use the clear barrel pens, pull out the tip and roll a piece of scrapbook paper and
insert it inside the barrel to match the clipboard.


Now it’s
ready to give away…that’s the best part!
Newspaper gift bags
They are easy, romantic and beautiful!
Make your own gift bags in minutes!

Follow the instructions (pictures) below:
1. Fold the newspaper as shown


4.Open the bottom as shown and fold the sides. Then glue them.

5.Open the bag and fold its top end.


6.You can add a doily and a ribbon if you like.


Subscribe to:
Posts (Atom)