A very clever tutorial of http://www.untrendylife.com/ on how to stamp your clothes or any other fabric with bleach! Look at the result....it is great!!!!
Showing posts with label crafts. Show all posts
Sunday, 27 January 2013
Saturday, 13 October 2012
Craft Tips!
Ucreate shares some tips that make our crafty lives
easier!
Here they are...
- Use a cookie sheet w/ newspaper or wax paper for a portable craft surface…super easy cleanup!
- Sharpen your scissors by cutting sand paper.
- Place a little bit of Vaseline to the end of your glue gun to get rid of those long glue strings.
- Soak your paint brushes in fabric softener or hair conditioner for 10 min…cleans right off!
- Recycle large plastic lids by using them for a painter’s pallette or cutting them up for stencils.
- Need to create a large pattern? Use newspapers!
- Keeping a magnet close by makes picking up those sewing pins a sinch!
- Store those pipe cleaners for kid’s crafts inside of a paper towel tubes.
- Break up some styrofoam to create snow for craft projects.
- Keep those cardboard boxes! Cut & cover with patterned paper to make a mini album, cover with art paper and use as a canvas, and I always use them to eliminate a mess while spraypainting!
Thursday, 4 October 2012
Tuesday, 2 October 2012
Another Mixed Media Art Journal video
She makes it look so simple!
She compines nice techniques with beautiful colors.
Enjoy!
Ετικέτες
art journal,
crafts,
DIY,
mixed media,
tutorial,
video
Sunday, 30 September 2012
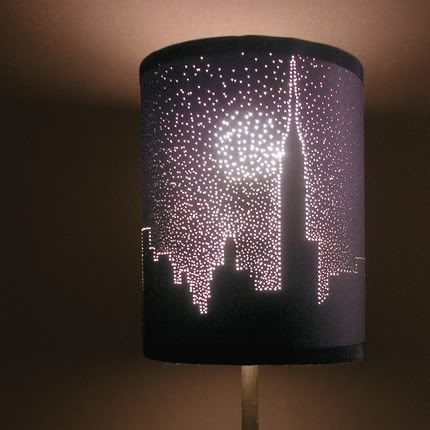
Altered Lampshade
This lovely lampshade is made by poking holes to make the picture. Easy to do, if you have a lampshade that looks simple or boring and you want to change it. Enjoy!
Thursday, 27 September 2012
Great mixed media video-Watch it!!!
Tuesday, 25 September 2012
Discovering the Art Journal
My new passion is art journaling.
I spend hours searching for techniques and talented artists to get inspired.
With this post I will start a series of Art Journaling artists' presentations and tutorials. I hope you enjoy them!
Please visit Teesha Moore's site
Saturday, 22 September 2012
Mixed media tutorial -Elements of magic
I watched this video and I loved it.
There are many mixed media techniques combined for the final result.
Very inspiring!!!
Friday, 21 September 2012
Sunday, 16 September 2012
Fabric covered mat
This tutorial is for creating a 8x10 mat that holds a 5x7 picture. Thanks to Delightful destructions blog .
MATERIALS:
THE PROCESS:
1.With all your supplies laid out and ready to go, spray the back side of the fabric and the front of the mat with a generous coat of spray glue (outside).
2.Lay your glue covered fabric on a table, glue side up. Carefully place your glue covered mat face down onto the fabric. Make sure to center it, leaving equal portions on each side. Press down firmly all over the back side of the mat. Check the front of the fabric to make sure all air bubbles are out.
3.Cut off the corners of the fabric with scissors... careful to leave only a tiny margin by the corner of the mat (see close-up pic)
4.Pulling firmly, starting next to the corner, pull the fabric up over the mat, one side at a time. Press down, smoothing out all air bubbles.
5. With your knife, cut the interior of the fabric diagonally out, starting in each corner -creating an X. Trim edges.
6. Again, pull fabric up over the edge of the mat, starting in the corners. Pull firmly to ensure that the fabric is tight, especially in the corners. Use Mod-podge on your foam brush to help adhere, if fabric doesn't stick. Once all edges are in place, use Mod-podge to go over the edges of the fabric for extra security and to prevent any fraying. Also pay special attention to the outside corners. These will need a dab of Mod-podge, smoothed down with your finger, also (second photo shows how corner should look before smoothing down).
7. Let dry thoroughly and place in frame!!
MATERIALS:
- a rectangular piece of cotton fabric approx. 11x13 in. or a bit bigger (it doesn't have to be cut perfectly)
- a 8x10 mat - you can either purchase a pre-cut mat or cut your own out of mat board
- spray glue -nothing beats 3M Super 77 found at Hobby Lobby or hardware stores
- a scissor - one you don't mind getting glue on
- a sheet rocking knife with a thin blade... an x-acto knife/craft knife will work, too
- Mod-podge
- small foam brush
THE PROCESS:
1.With all your supplies laid out and ready to go, spray the back side of the fabric and the front of the mat with a generous coat of spray glue (outside).
2.Lay your glue covered fabric on a table, glue side up. Carefully place your glue covered mat face down onto the fabric. Make sure to center it, leaving equal portions on each side. Press down firmly all over the back side of the mat. Check the front of the fabric to make sure all air bubbles are out.
3.Cut off the corners of the fabric with scissors... careful to leave only a tiny margin by the corner of the mat (see close-up pic)
4.Pulling firmly, starting next to the corner, pull the fabric up over the mat, one side at a time. Press down, smoothing out all air bubbles.
5. With your knife, cut the interior of the fabric diagonally out, starting in each corner -creating an X. Trim edges.
6. Again, pull fabric up over the edge of the mat, starting in the corners. Pull firmly to ensure that the fabric is tight, especially in the corners. Use Mod-podge on your foam brush to help adhere, if fabric doesn't stick. Once all edges are in place, use Mod-podge to go over the edges of the fabric for extra security and to prevent any fraying. Also pay special attention to the outside corners. These will need a dab of Mod-podge, smoothed down with your finger, also (second photo shows how corner should look before smoothing down).
7. Let dry thoroughly and place in frame!!
Friday, 14 September 2012
Sticky Notes Clipboard from Coasters
Thanks to huckabyshappilyeverafter.blogspot.gr
What you’ll
need:
-Restaurant coasters from places like
On the Border, Chili’s, etc. (just ask for them, they gave me a hand full)
-Scrapbook paper
-Elmers glue or Tacky glue
-Binder clips (these came in different
colors from Staples)
-Ink to do distressed edges (I used Tim
Holtz Distress Ink in Walnut)
-Foam ink applicator
-Ribbons & embellishments
First,
choose your choice of scrapbook paper. I used two coordinating pieces so that I
can do one on each side. You’ll want to then trace the coaster onto the back
side of the scrapbook paper and then cut carefully. I had to cut just inside my
line I drew so that it wouldn’t hang off the edges.
Next you want
to place glue on the coaster evenly. Make sure you get right up to the edges to
prevent lifting. I kind of spiraled around the coaster and used my finger to
spread the glue as you can see in the pictures.
Carefully
place the paper onto the coaster. Make sure you then press out all the bubbles,
I used a credit card. Do this on both
sides of the coaster. Be careful not to
but too much glue because it’ll make the coaster warp a bit. If you notice
this, just place a heavy book on top of it until it dries completely.
Optionally,
you can ink the edges. This paper I picked looks good with inked edges but you
don’t have to. Start with SMALL strokes. It’s easier to add more if you think
you need more later. As you can tell in the picture, I only ink on one side of
the foam applicator. Just dab once or twice lightly.
Then start
off just going side to side on the very edge of the coaster. ALWAYS
start from
the edge, not from the middle of the paper. Once you get a little
comfortable
on the inking, SOFTLY drag the foam applicator starting from the edge
and with
short small strokes. I like my corners dark so I gave it at least 3
passovers
on the corners. Do this to both sides and let dry for about 30 minutes. I
didn't put any Modge Podge but someone recommended so, but this is
optional once it's completely dried.
Next, dress
up you binder clip. You can add ribbons, embellishments, or even glue some of
the scrapbook paper on to the binder clip so it’ll match.
| Here I just tied strips of ribbon in to knots one on top of the other. |
Now all you
need is your post it note. But how about a writing utensil to go with it. If
you use the clear barrel pens, pull out the tip and roll a piece of scrapbook paper and
insert it inside the barrel to match the clipboard.
Now it’s
ready to give away…that’s the best part!
Ετικέτες
coasters,
crafts,
decoration,
decoupage,
DIY,
Sticky Notes,
tutorial
Newspaper gift bags
They are easy, romantic and beautiful!
Make your own gift bags in minutes!
Follow the instructions (pictures) below:
1. Fold the newspaper as shown
2. Glue the folded sides
3. Fold the bottom
4.Open the bottom as shown and fold the sides. Then glue them.
5.Open the bag and fold its top end.
6.You can add a doily and a ribbon if you like.
Wednesday, 12 September 2012
Key portrait
Nice vintage decoration idea. Easy to make if you have old keys and a nice frame.
Thanks to Mod Podge Rocks! ( http://www.modpodgerocksblog.com)
Supplies
-Sad wall art
-Mod Podge Fabric
-Mod Podge Clear Acrylic Sealer - Gloss
-FolkArt Acrylic Paint - Jamaican Sea, Ocean Cruise, Calypso Sky, Titanium White (optional)
-Apple Barrel Acrylic Paint - Pool Blue, Cool Blue, Regency Blue
-Fabric, coordinating piece to cover your background
-Paintbrushes, one small and one medium
-Craft glue
Start with a fun piece of wall art. It can be broken. Or not.
Take the goods off. I had to pry slowly so as not to break my keys.
Patience is a virtue, my friends. Remove the back of the portrait from
the frame.
Sand down the background (if you need to) and then paint it Titanium
White. My background was dark, so it was necessary to paint a lighter
color so that the background doesn't show through. It will definitely
show through if the background is dark and the fabric isn't thick. Allow
to dry.
Make
sure your fabric is washed, dried and ironed. Prepare the fabric with
Mod Podge Fabric - this means putting the fabric down on a non-stick
surface and applying a medium layer of Mod Podge. Allow to dry. You can
now cut the fabric without it fraying, and it's easier to apply to a
finished surface because it won't wrinkle.
Here I'm applying Mod Podge to the back piece. Apply a medium layer and
then lay your fabric down - smooth, smooth and smooth! Push all of the
air bubbles out and wipe away any excess Mod Podge that comes out the
sides. Allow to dry. Once the fabric has dried to the back piece, give
the top another coat of Mod Podge. Allow to dry.
Paint
your frame with Jamaican Sea. I used the tiny brush and gave it several
coats. It went on surprisingly well, and I really enjoyed the painting.
Very cathartic.
TIP ALERT: So what am I doing in the photo above? It's a technique I'd
like to share with you. I've laid the frame over the background, put the
keys back in and then put some color chips down to figure out what
colors I wanted to paint my keys and in what order. MAKE COLOR CHIPS for
your paint colors now if you don't have them - even if you simply paint
strokes in a notebook. It will help you immensely when you put color
palettes together or are trying to match something, because colors in
the bottle DO NOT look the same when dry. I'm done preaching now.
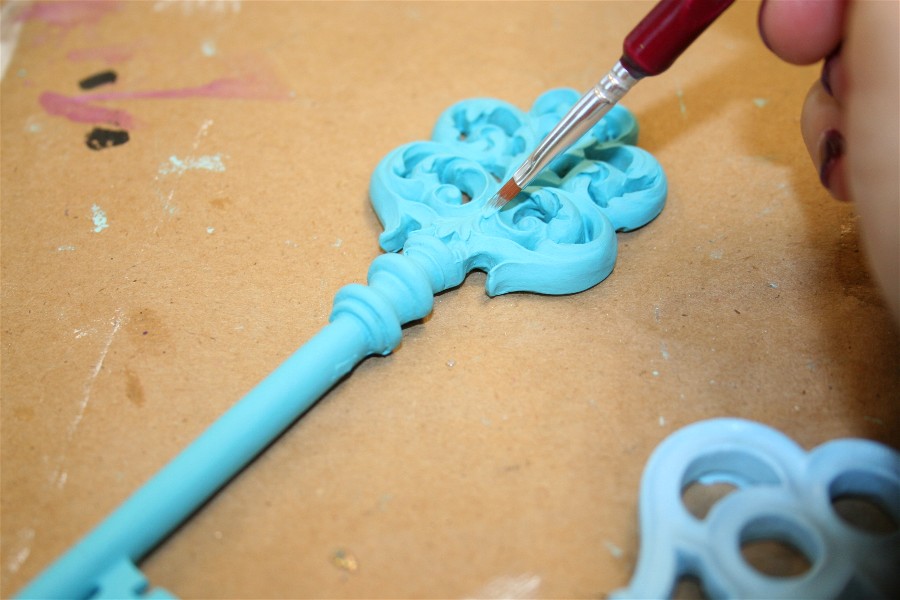
Paint your keys with your paint colors. It's going to take several coats, but it's fun.
Thanks to Mod Podge Rocks! ( http://www.modpodgerocksblog.com)
Supplies
-Sad wall art
-Mod Podge Fabric
-Mod Podge Clear Acrylic Sealer - Gloss
-FolkArt Acrylic Paint - Jamaican Sea, Ocean Cruise, Calypso Sky, Titanium White (optional)
-Apple Barrel Acrylic Paint - Pool Blue, Cool Blue, Regency Blue
-Fabric, coordinating piece to cover your background
-Paintbrushes, one small and one medium
-Craft glue
Subscribe to:
Posts (Atom)


.jpg)