Showing posts with label bracelet. Show all posts

Sunday, 29 July 2012

Metal beads bracelets

Look at those beautiful bracelets with metal beads! You can make them in different colors and wear all of them to make a happy and playful style. Watch the tutorial at http://makebraceletsblog.com. It is very easy!
Enjoy!


Friday, 20 July 2012

Multi chain Best Friend Bracelet

This is a very nice idea. The bracelets you can make are cheap and chic. Go ahead and make it!


Sunday, 8 July 2012

Beaded Loop Clasp

Source: http://www.liveinart.org/


Materials Needed:

3 yards of waxed linen cord
20 size 8/o seed beads

Directions:
I am basing the thickness of this loop (6 strands of cord) on the bracelet that I made. Adjust yours according to how many strands you would like to bead.


1. Cut cord into five 12" pieces. Cut a sixth strand into a 14" piece.

2. Place 20 beads onto one of your 12" strands of waxed linen cord.


3. Space the slightly beads apart.


4. Match the ends of all your strands, twist the ends together so that they hold. Hold ends together firmly in one hand. Using your free hand, pick up your 14" cord and wrap it tightly around all of the cords in front of the first bead, leaving 2" of "waste" on the end for later use. Push the first bead up tight against the loop.


5. Wrap your 14" cord around the all of the cords behind the first bead, in front of the second bead. Make sure that it's very tight. Hold firmly with your fingers. Continue this pattern until all 20 beads are wrapped.


6. Wrap your 14" cord around all of the strands one more time. Then, pick up the 2" of "waste" to create a loop & knot.


7. After making your bracelet using the remainder of the cord, tie a button onto the other end that fits into your beaded loop clasp. I made my button by drilling holes into a small river rock.


Have fun with all sorts of designs!


Thursday, 5 July 2012

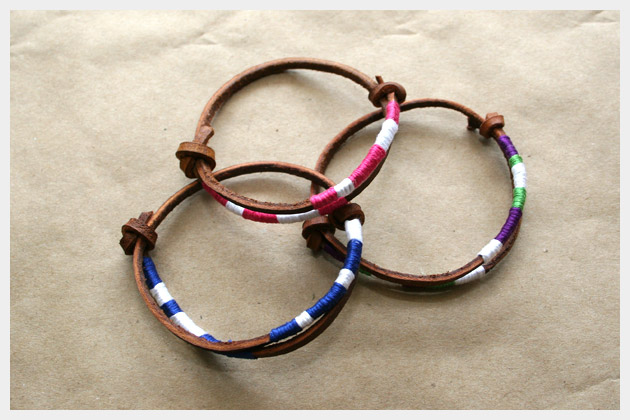
DIY LEATHER FRIENDSHIP BRACELETS


They are so quick to make and look amazing stacked with other friendship bracelets, chain bracelets, you name it!
You can never have enough friends, or friendship bracelets for that matter.
They say “more is more” and with these bracelets you can add a pop of color to your arm candy while keeping it subtle with leather, you CAN have it all!
DIY Leather Friendship Bracelets

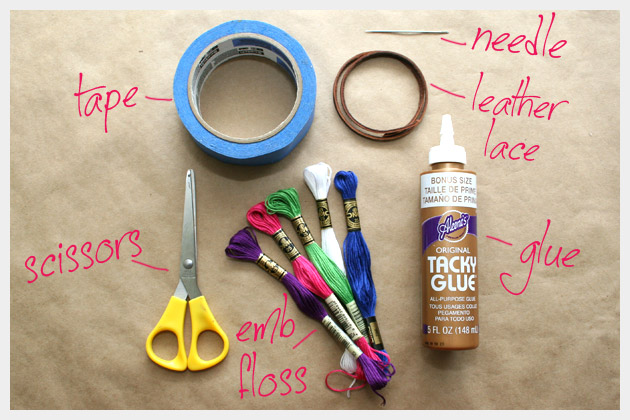
What you’ll need to make your Friendship Bracelets:

  • 1/8” Leather Laces – I used 20” long pieces for each bracelet
  • Embroidery floss
  • Glue
  • Scissors
  • Tape
  • Needle
Supplies To Make DIY Leather Friendship Bracelets
 
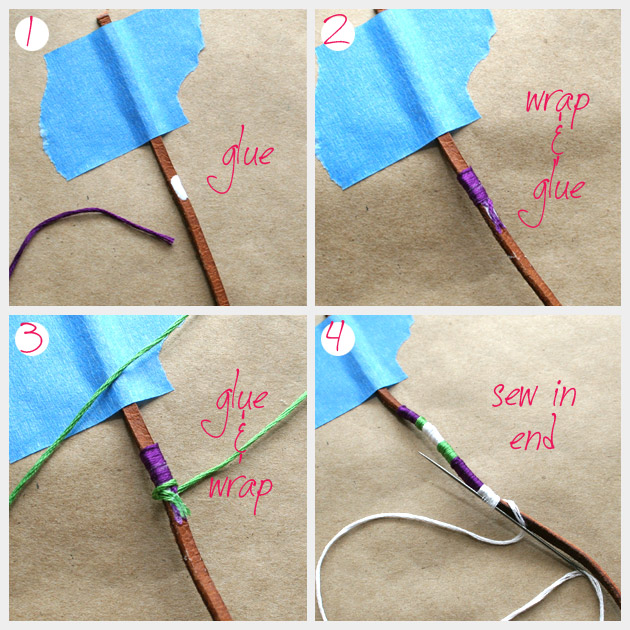
Step 1
Measure your wrist by wrapping the leather lace around your wrist loosely twice and then add an extra 4 inches for knotting.
Tape one end of your leather lace down and starting at least 2 inches down, place a drop of glue on the leather lace and attach the end of your first color of embroidery floss.

Step 2
Continue wrapping your embroidery floss around your leather lace until you have made a stripe as wide as you want with your first color. When it’s as wide as you want, cut the end leaving about a half inch tail and glue that tail to your leather lace.

Step 3
Take your 2nd color of embroidery floss and glue the end down on top of the previous colors end. Wrap until you have made this stripe the width you want and secure the end as you did in step 2.
Continue doing steps 2 and 3 until you have about 2 inches of color stripes with your embroidery floss.

Step 4
When you are finished wrapping, take your needle and run the end of your embroidery floss through your wrappings. If you want you can add a small drop of glue to make sure your embroidery floss doesn’t come unwrapped.DIY Project Leather Friendship Bracelets

Step 5
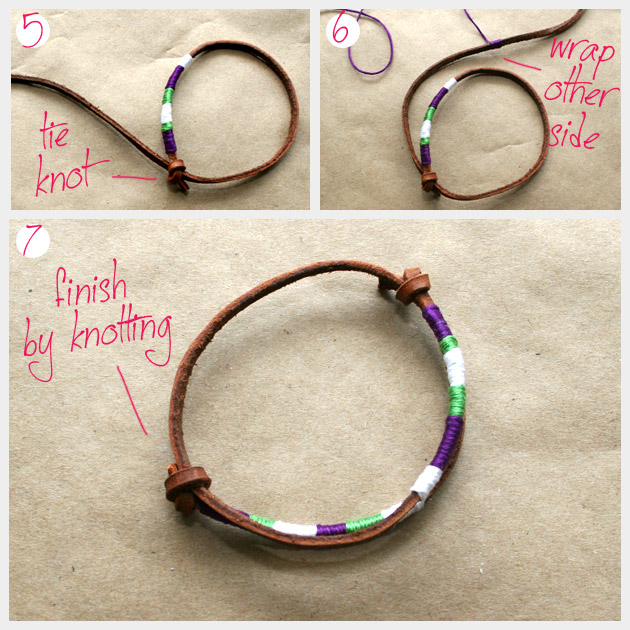
Tie the end of your lace that is closest to the wrapping around the other side of the leather lace. Just make a simple knot. It should be tight but the leather lace should slide through, this is how you will adjust your bracelet.

Step 6
Leaving at least 2 inches on the other open end of your leather lace, start wrapping your embroidery floss around repeating steps 1, 2, 3, & 4.

Step 7
When you have finished wrapping your second side of your bracelet, tie the open end to the other side of your friendship bracelet.How To Make Leather Friendship BraceletsLeather Friendship Bracelets DIY Project

Monday, 25 June 2012

Heart friendship bracelet


The basics:

Hold the second string with your left hand as you use your right hand to take the first string over and then under the second string. Pull the first string through so that it forms a 90-degree angle as you guide it away from you, towards the knot holding together the bracelet. Do this two times to make each knot. Hold on to that first string with your right hand! For the next knot going right, repeat these steps holding the third string in your left hand. Keep working with the first string as you work your way to the middle – for this pattern you will need to make three knots across in each direction. After three knots, make another knot to join the first and eighth strings in the middle.

Hold the seventh string with your right hand as you use your left hand to take the eighth string over and then under the seventh string. Pull the first string through so that it forms a 90-degree angle as you guide it away from you, towards the knot holding together the bracelet. Do this two times to make each knot. Hold on to that first string with your left hand! For the next knot going left, repeat these steps holding the sixth string in your right hand. Keep working with the eighth string as you work your way to the middle – for this pattern you will need to make three knots across in each direction. After three knots, make another knot to join the first and eighth strings in the middle.

The pattern:
1: Lay your strings out as shown. The color of the first and eighth thread will be the color of the heart shape.
2: Make your first row by following the instructions for making a row of knots going right and then left. Remember to join the two threads you were knotting with in the middle.
3: Make a second row of knots in the same way, this time with the second color.
4: Take the second string and knot it around the first string going left. Then, take the seventh string and knot it around the eighth string going right.
5: Fill in the space between the knots you made in step 4 with the first color by knotting the second string around the third and fourth strings going right and then the seventh string around the sixth and fifth strings going left. Join them in the middle. This step forms the top of the heart.
6: Take the second string and knot it around the first string going left. Knot the seventh string around the eighth going right. This step forms the outermost points of the heart.
7: Fill in the heart with the second color by making two knots to the right with the second string and two knots to the left with the seventh string. Join them in the middle.
8: To form the bottom of the heart, take the first string and knot it around the second and third strings going right. Next, take the eighth string and knot it around the seventh and sixth strings going left. Join the first and eighth strings in the middle.
9: Keep repeating these steps until you’ve made a bracelet. Have fun!
Tuesday, 8 May 2012

My new bracelets

My new leather bracelets!!!!!


Wednesday, 2 May 2012

Macrame bracelets

A very detailed tutorial from honestly wtf on Macrame bracelets. Step by step instructions with very nice photos.
Click here to visit the site.


Friday, 13 January 2012

Zipper Flower TUTORIAL

Here there is a very simple tutorial to make a zipper flower bracelet. After that, you can use your imagination and creat thousants of patterns!!!! Enjoy!!!

Zipper flower